


 Chat Now
An LED display event video wall is a portable, modular digital display system designed specifically for temporary events—such as concerts, conferences, trade shows, weddings, and sports tournaments—to deliver dynamic visual content that enhances audience engagement and event storytelling. Unlike permanent LED installations (e.g., stadium scoreboards or retail atrium walls), this technology prioritizes portability, quick setup/teardown, and flexibility to adapt to diverse event venues, from small conference rooms to large outdoor festival grounds.
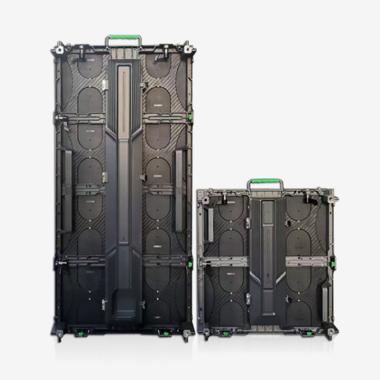
At its core, the system consists of lightweight LED panels (typically 2–5kg per panel), a compact control system, and a portable support framework—all optimized for frequent transportation and rapid deployment. Key specifications are tailored to event needs: pixel pitches range from 1.5mm (for close-range indoor events like product launches) to 10mm (for large outdoor festivals), ensuring clear visibility across different audience distances. Brightness levels are adjustable, spanning 2,000–8,000 nits, to adapt to varying lighting conditions—from dim conference halls to sunlit outdoor stages. Refresh rates of 120Hz+ ensure smooth video playback, critical for displaying live event feeds, animations, or sponsor ads without flicker.
In recent years, the demand for LED display event video walls has surged, driven by the growth of experiential events and the need for visually striking content. According to event industry reports, over 70% of event planners now use digital display technology to enhance attendee experiences, with LED video walls being the most popular choice. For example, a music festival might use a 10x5m LED wall as a stage backdrop to display live camera feeds of the artist and dynamic graphics synced with the music. A corporate conference could deploy a 4x3m wall in the main hall to showcase keynote presentations and real-time social media feeds from attendees.
What sets this technology apart is its versatility in content delivery and venue adaptation. Event video walls support a wide range of content formats, including 4K videos, interactive polls, live streams, and custom branding elements. They can be configured into various shapes—straight walls, curved backdrops, or even “video curtains” (hanging panels)—to fit the event’s theme and venue layout. Additionally, modern systems integrate with event management tools, allowing planners to update content in real time (e.g., changing sponsor ads between sessions or displaying emergency alerts) and track engagement metrics (e.g., how many attendees interact with a touch-enabled wall). As events continue to evolve toward more immersive, tech-driven experiences, the LED display event video wall remains a critical tool for creating memorable, engaging moments for attendees.
The design and construction of an LED display event video wall prioritize three core event-specific needs: portability for frequent transportation, rapid deployment for tight event timelines, and durability to withstand repeated setup/teardown. Every component—from LED panels to control systems—is engineered to balance performance with practicality, ensuring the system can adapt to diverse venues and event requirements.
Component Design: Portability and Performance
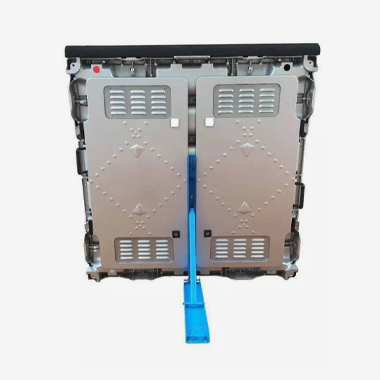
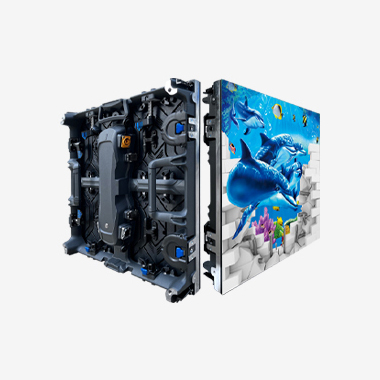
LED panels are the foundation of the system, and their design is optimized for event use. Unlike permanent installation panels (which are heavy and rigid), event panels are lightweight (2–5kg per panel) and slim (50–80mm thick), making them easy to carry and stack in transport cases. They are constructed with a rugged aluminum alloy frame that protects internal components from minor impacts during transit—critical for events that require moving the system between venues. The front surface uses a scratch-resistant, high-transparency acrylic layer to maintain image clarity while withstanding accidental scratches from setup equipment. Each panel contains RGB LED chips with a wide color gamut (90%+ DCI-P3) to ensure vibrant, consistent colors—essential for displaying event branding and sponsor ads accurately.
The control system is compact and user-friendly, designed for quick setup by event staff (who may not have technical expertise). It includes a portable media server (small enough to fit in a backpack) that connects to the LED panels via HDMI, DisplayPort, or network cables. The server runs intuitive event-specific software that allows users to upload content, schedule playlists, and adjust settings (brightness, volume) with a touchscreen interface. For large events, redundant control systems are often included—if the primary server fails, a backup takes over instantly to avoid downtime. Wireless connectivity (Wi-Fi/Bluetooth) enables remote content updates, so planners can change ads or presentations without physically accessing the server.
Structural Framework: Flexibility and Speed
The support framework is designed for rapid assembly and adaptability to different venue sizes. Unlike permanent installation frames (which require drilling or heavy anchors), event frameworks use lightweight aluminum trussing or modular rails that connect via quick-lock fittings—no tools required. For floor-mounted setups (e.g., conference backdrops), the framework includes a stable base with weighted plates (filled with sand or water) to prevent tipping, even in crowded event spaces. For stage backdrops or hanging installations (e.g., “video curtains” at festivals), the framework uses adjustable suspension cables that attach to venue rigging points or portable truss towers. The framework can be configured into custom sizes and shapes in 30 minutes to 2 hours—critical for events with tight setup windows (e.g., a trade show that allows only 4 hours of booth setup).
Cable management is a key design element to ensure a clean, professional appearance. Power and data cables are routed through the framework’s internal channels, eliminating visible wires that could distract from the event’s aesthetic or pose tripping hazards. Quick-connect cable harnesses allow panels to be linked together in minutes—each harness has color-coded connectors to prevent setup errors. For outdoor events, cables are shielded with weatherproof jackets (IP65-rated) to protect against rain or dew, while indoor systems use fire-retardant cables to comply with venue safety codes.
Durability and Quality Control: Repeated Use
Event video walls must withstand repeated setup/teardown and transportation, so durability is built into every component. LED panels undergo drop tests (from 1.2m heights) and vibration tests (simulating truck transport) during manufacturing to ensure they can withstand rough handling. The aluminum frames resist dents and corrosion, while the acrylic front layer is tested for scratch resistance (withstanding 3H pencil hardness). Control systems are housed in shock-absorbent cases with foam padding to protect against impacts during transit.
Quality control is rigorous to ensure reliable performance at events. Before each deployment, the system undergoes a full test: panels are checked for dead pixels, the control system is verified to play all content formats, and the framework is inspected for loose fittings. Rental companies (which supply most event video walls) also maintain detailed maintenance records for each system, replacing components (e.g., cables, LED chips) after a set number of uses to prevent failures. This focus on design and construction ensures the LED display event video wall can deliver consistent, high-quality performance across dozens of events—from small corporate meetings to large-scale festivals.
The working principle of an LED display event video wall revolves around the coordinated operation of modular hardware and event-specific software to deliver dynamic, real-time content—with a focus on quick setup, flexible content management, and adaptability to venue conditions. Unlike permanent LED walls (which are calibrated once and left in place), event systems must be rapidly configured and adjusted to meet the unique needs of each event, from lighting conditions to content requirements.
Stage 1: Content Preparation and Management
The process begins with content preparation, typically done by the event planner or a rental company’s technical team. Content—such as presentations, videos, live feeds, or sponsor ads—is uploaded to the portable media server using event-specific software. This software is designed for simplicity, with drag-and-drop interfaces that allow users to create playlists, schedule content (e.g., “play Sponsor A’s ad at 10 AM, then switch to the keynote presentation at 10:30 AM”), and adjust settings like brightness or volume. For interactive events, the software integrates with input devices (e.g., touch sensors, cameras, or social media APIs) to enable real-time content updates—for example, displaying a live poll results or a social media feed with the event’s hashtag.
The software also optimizes content for the wall’s specifications: it scales the content to match the total resolution (e.g., a 4x3 panel wall with 2.5mm pixel pitch has a resolution of 2,560x1,920) and adjusts aspect ratios to avoid stretching. For events with multiple content sources (e.g., a conference with a keynote presentation and a live feed of the audience), the software uses “windowing” to split the wall into sections, each displaying a different source—all synchronized to avoid lag.
Stage 2: Rapid Setup and Configuration
On the event day, the setup process begins with assembling the support framework. Using quick-lock fittings, technicians connect the aluminum trussing or rails to form the desired shape (e.g., a 6x4m straight wall). The framework is secured with weighted bases (for floor setups) or suspension cables (for hanging setups) to ensure stability. Next, LED panels are mounted to the framework using magnetic or mechanical latches—each panel aligns with adjacent units via built-in alignment pins, ensuring seamless edges (gaps <0.5mm) to avoid disrupting content.
Once panels are mounted, the control system is connected. The media server is linked to the panels via quick-connect cable harnesses, which transmit both power and data. The server automatically detects the number of panels and their configuration (a process called “auto-mapping”), eliminating the need for manual pixel mapping (a time-consuming step in permanent installations). Technicians then calibrate the system to the venue’s lighting conditions: using a light meter, they adjust the wall’s brightness (e.g., 2,000 nits for a dim conference hall, 6,000 nits for an outdoor stage) and color temperature to ensure content is visible and vibrant. This entire setup process typically takes 1–3 hours for a medium-sized wall (10–15 panels)—critical for events with tight timelines.
Stage 3: Content Playback and Real-Time Adjustment
During the event, the media server streams content to the LED panels via high-speed data transmission. Each panel’s receiving card decodes the data and converts it into electrical signals for the RGB LED chips. The chips use Pulse-Width Modulation (PWM) at 120Hz+ to control brightness and color, ensuring smooth motion for live feeds or videos. For interactive events, input devices (e.g., touch sensors) send data back to the server—for example, if an attendee taps a touch-enabled wall to vote in a poll, the server processes the input and updates the content to display the latest results within seconds.
Event staff can make real-time adjustments to the content using a wireless control tablet. They can switch between playlists (e.g., changing from a sponsor ad to a speaker introduction), adjust brightness if lighting conditions change (e.g., dimming the wall as the sun sets at an outdoor event), or display emergency alerts (e.g., a weather warning). The system also includes built-in diagnostics that monitor panel health and signal strength, sending alerts to the control tablet if an issue is detected (e.g., a loose cable or a dim panel). This allows technicians to resolve problems quickly, often without interrupting the event.
Stage 4: Teardown and Transport
After the event, teardown is as rapid as setup. Technicians disconnect the control system, remove the LED panels from the framework, and disassemble the trussing—all in 1–2 hours. Panels and components are packed into custom transport cases lined with foam to protect against damage during transit. The cases are designed with wheels and handles for easy 搬运,even in crowded venue loading docks. This quick teardown is critical for events that share venues (e.g., a conference center hosting multiple events in one day) or for touring events that move to a new city daily.
LED display event video walls offer significant advantages that make them a preferred choice for event planners, but they also face unique challenges tied to the temporary, fast-paced nature of events. Understanding these pros and cons is critical for event teams looking to leverage the technology effectively.
Key Advantages
1. Enhanced Audience Engagement and Experience
The primary advantage of LED display event video walls is their ability to create immersive, engaging experiences that captivate attendees. Unlike static backdrops or projectors (which are prone to washout in bright light), LED walls deliver vibrant, high-contrast content that stands out in any venue. For example, a music festival’s stage wall can display live camera feeds of the artist, dynamic graphics synced with the music, and lyrics—turning a passive concert into an interactive experience. A corporate conference can use a wall to display real-time social media feeds, allowing attendees to see their posts on the big screen and feel more connected to the event. Studies show that events with digital displays see a 30–40% increase in attendee engagement compared to those without, with attendees spending more time interacting with content and staying longer at the event.
2. Flexibility and Adaptability to Venues
Event video walls are highly flexible, able to adapt to diverse venue sizes and layouts. Their modular design allows them to be configured into custom sizes (from 2x2m for small meetings to 20x10m for large festivals) and shapes (straight, curved, hanging, or floor-mounted) to fit the event’s theme and venue constraints. For example, a wedding might use a 3x2m curved wall as a backdrop for the head table, displaying photos of the couple. A trade show booth could deploy a 4x1m “video banner” to showcase product demos in a small space. Additionally, the walls’ adjustable brightness and resolution allow them to perform well in any lighting condition—from dim ballrooms to sunlit outdoor stages. This flexibility eliminates the need for event planners to source venue-specific display solutions, simplifying logistics.
3. Cost-Effectiveness for Temporary Use
For most events, renting an LED video wall is more cost-effective than purchasing or using alternative technologies. Purchasing a high-quality event video wall can cost
20,000–100,000, which is impractical for events that only run for a few days. Rental costs typically range from
300–800 per panel per event (including setup, teardown, and technical support), making the technology accessible to event planners with varying budgets. For example, a 10-panel wall for a 3-day conference might cost
4,500–12,000—far less than the cost of purchasing. Additionally, rental companies handle maintenance, repairs, and software updates, eliminating long-term costs for event teams. Compared to projectors (which require expensive bulbs and are prone to failure), LED walls have lower maintenance costs and higher reliability, reducing the risk of event disruptions.
4. Real-Time Content Control and Branding
LED display event video walls allow planners to update content in real time, a critical feature for dynamic events. Using a wireless control tablet, staff can switch between sponsor ads, presentations, or live feeds in seconds—no technical expertise required. For example, a sports tournament could update the wall to display the latest scores between games, or a conference could change the branding between sessions for different sponsors. This real-time control also enables quick responses to unexpected changes, such as displaying emergency alerts or adjusting content to match the audience’s mood. Additionally, the walls offer ample space for custom branding, helping events stand out and reinforce their identity. A tech conference could display its logo and hashtag throughout the event, while a product launch could use the wall to showcase the product’s features in high detail.
Key Challenges
1. Logistics and Transportation
While event video walls are designed to be portable, their transportation and handling can still be logistically challenging. A medium-sized wall (10–15 panels) requires multiple transport cases (each weighing 20–30kg), which need to be transported to the venue via trucks or vans. For events in remote locations or venues with limited loading access (e.g., historic buildings with narrow doorways), moving the equipment can be time-consuming and costly. Additionally, rental companies may charge extra for long-distance transportation, increasing the event’s budget. For example, transporting a wall from a rental warehouse 200km away could add
500–1,000 to the rental cost, plus labor for loading and unloading.
2. Setup Time and Technical Expertise
While setup is faster than permanent installations, event video walls still require time and technical expertise to assemble correctly. A medium-sized wall typically takes 1–3 hours to set up, which can be problematic for events with extremely tight timelines (e.g., a morning conference that requires setup at 6 AM). Additionally, while the control software is user-friendly, calibrating the wall to the venue’s lighting conditions and troubleshooting issues (e.g., a loose cable or a dead pixel) requires trained technicians. Many event planners need to hire additional technical staff for setup and during the event, adding to labor costs. For example, a 1-day event with a large wall might require two technicians (one for setup, one for on-site support), costing 800–1,200 in labor fees.
3. Venue Limitations and Compatibility
Some event venues have limitations that can impact the use of LED video walls. Small venues (e.g., intimate conference rooms) may not have enough space for a large wall, forcing planners to downsize their desired setup. Venues with low ceilings or no rigging points may not support hanging installations, limiting the wall’s configuration. Additionally, older venues may have electrical systems that cannot handle the wall’s power requirements (a medium-sized wall typically uses 2–5kW). Planners may need to rent additional power generators or upgrade the venue’s electrical system, adding to the event’s cost and complexity. For example, a historic venue with outdated wiring might require a $1,000 electrical upgrade to support the wall, plus the cost of a backup generator.
4. Weather Vulnerability (Outdoor Events)
While outdoor event video walls are designed to be weather-resistant (IP65-rated), they are still vulnerable to extreme weather conditions. Heavy rain, strong winds, or extreme temperatures can damage the equipment or disrupt performance. For example, a sudden rainstorm could short-circuit the panels if the cable connections are not properly sealed, or high winds could tip over a floor


Copyright © 2026 Shenzhen Cogo Technology Co.,Ltd.
All Rights Reserved

 Previous article